Tuesday, February 21, 2012

Understanding White Balance

Perhaps one of the most important camera settings that beginning digital photographers don’t understand is white balance. In this article, we’ll introduce the basic concept of white balance as well as a few photography tips for managing the white balance within your images.
What is white balance?

Put simply, white balance is the color of the lighting in your images. It might seem like a strange concept at first to think that light has color, but various types of light produce different hues which are reflected in your photograph. For example, indoor fluorescent lighting commonly produces a bluish hue, filtered or indirect natural sunlight produces a cool blue tone, and other natural forms of light like a fire produce a very warm tone within the image.

While these variations may not be visible to the human eye since our eyes adapt to compensate for them, in a digital images they can be very noticeable and can produce vastly different temperatures within your photograph. Therefore controlling for and adjusting the white balance in your images can change the feel of a photo completely.

How to manage white balance
Most digital SLR cameras come pre-programmed with a range of white balance settings. These commonly include:
Auto: This setting will work well for many settings as the camera will automatically adjust for the appropriate lighting.
Fluorescent: Useful when shooting indoors under fluorescent lights to compensate for high levels of blue.
Shade: Again, this setting will warm up cool, dark hues in shaded areas by adjusting accordingly.
Cloudy: This is a very useful setting for warming up an image on cloudy days where the dark skies might produce elevated levels of blue.
Sunny: This setting may go by different names according to the camera manufacturer, but in essence it makes very minor adjustments on most models to adjust for direct outdoor sunlight.
Tungsten: Programmed for shooting indoors under incandescent lighting, this will adjust for the high levels of yellow produce by most indoor light bulbs

Flash: This setting will adjust the white balance to mitigate against the harsh lighting of a flash.
Most DSLR cameras will also have manual white balance setting which we will discuss in more detail in a follow-up article. This process involves “teaching” your camera what you want the lighting to look like in an image, so we’ll discuss this setting alone. However, most of the settings listed above will allow you to capture great images making only one setting adjustment.

With these white balance photography tips, you’ll be able to capture the lighting you want for your photograph regardless of where you’re shooting.

Avoiding Red Eye in Your Photos

While many new DSLR cameras do a great job of filtering out red eye problems, it’s not always the case. In this article we’ll take a look at a couple of quick photography tips for dealing with the dreaded red eye effect in your images.

So what causes red eye in photos?
While you’re probably just interested in finding out how not to have red eye effects in your images of people, it can be helpful to take a quick look at the issues that cause this effect in order to help you circumvent this problem. The red eye effect is caused by a direct reflection from a flash off of the back of a human retina. Essentially, because most built in flash units are just an inch or two from the lens, the flash sends light which is bounced from the back of the human retina, and reflects straight back into the lens of the camera. This reflection comes across in images as a red color, thus creating the red eye effect.

How do you eliminate red eye?
The first photography tip for eliminating red eye in your photos is to check to see if your camera has a built in red eye reduction setting. Most newer DSLRs and point and shoot cameras come with this feature. This setting will change your flash mode to help significantly reduce the effect of red eye in your photographs. It actually causes the flash to go off twice in two microbursts. The first small flash serves to cause your subjects pupils to contract and close, which reduces the amount of the retina which is exposed to the flash. When the second flash is triggered, the contracted retina produces almost no noticeable red eye effect.

Whether or not your camera does have a built in mode for this problem, you can also take a second step. You can change the direction of the flash. Now, most built in flash units won’t allow you to change the direction in which they throw the flash, so this will require a separate flash unit, which can be purchased relatively inexpensively. My personal favorite is the Nikon Speedlight Series, which comes at a range of price points. By using one of these external flashes, you can change the direction of the strobe by pointing the flash up toward the ceiling, or even using it without mounting it on the camera body and aiming it slightly to the right or left of your subject.

And there you have it. Two easy photography tips for eliminating the dreaded red eye effect in your photos for good.

Photography Tips for Holiday Gatherings

As we head into the Thanksgiving holiday here in the U.S., we wanted to put together a few of our photography tips culled from various past articles that you can use to capture great images of the typical holiday festivities you might be involved in. As we approach this time of year, it’s very likely in most parts of the country that many of your holiday activities will be indoors due to the shorter days, colder weather, and also since most of the Thanksgiving pleasures center around the kitchen! This being the case, shooting indoors with a full house of family or friends all moving around and celebrating can make it difficult to capture clear, crisp, warm images. Here are a few selected photography tips for getting great holiday images in your home.

Use natural light if possible…
I always, always prefer using natural light as often as possible, even when indoors. If you’re hosting your holiday festivities in an environment with few windows, you’re out of luck here. But if the rooms have plenty of windows, try to open up as many of the window coverings (blinds, shades, etc.) as you can to reduce your dependency on flash lighting. This can bring tremendous amounts of warmth to your images as opposed to using a flash to light your images.

…but if you can’t, use indirect light.
If you don’t have natural light to take advantage of, consider bouncing your flash off of a wall or the ceiling. Many flash units and speedlights now come with rotating flash heads, making them a perfect choice for sending the flash light in a direction other than straight at your subjects. This can really do a great job helping to reduce the powerful wash out effect of flash lighting. In a pinch, I’ve also placed items like an opaque plastic bowl or a bit of wax paper over the built in flash unit on my camera body to reduce the power of the flash and hence warm up the image a bit. Just be careful if you try this technique as it can produce undesired imbalances in the lighting. Be sure to check your LCD screen.

Capture the candids!
Holiday gatherings are a great time to catch people just laughing and having conversations. In my family, it always seems that the old timers tend to gather in the corner and share stories that probably aren’t suitable for the kids in the room. I always like sneaking over and catching those types of moments. Just be discreet and see what you can come up with.

Here come the group shots…
Since the holidays are often the only time of year that many families are able to come together, it’s always good to try to get everyone together for a group shot, as long as your setting and family dynamics allow it! Composing group shots is usually a challenge and we’ve written a couple of articles just on photography tips for groups. However, it typically boils down to proper composition, getting everyone to look at the camera, and making sure to reduce any unwanted red eye or glare from eyeglasses. Try to make sure that your composition is balanced, meaning everyone is relatively close together and symmetrical from front to back and left to right. To reduce red eye, either use the appropriate red eye reduction setting on your camera or set your flash to throw indirect light. And to avoid glare from eyeglasses, have anyone wearing them simply tilt their head slightly downward (remember: slightly, not looking at the floor!).

By putting a few of these simple photography tips in place, you can make sure to capture the wonderful memories of your holiday gatherings.

HDR and Beyond – Seeing is Believing!

A Guest Post by by Gavin Phillips
1.jpg

What is High Dynamic Range Imaging? (HDR)

HDR is when you take 3-5 or 7 photos at different exposure settings, and then merge them into a single image using speciality software. What you get are beautiful photos with incredible detail, controlled lighting and accurate colour. You cannot reproduce an HDR image manipulating a single JPG or RAW image in Photoshop.
2.jpg
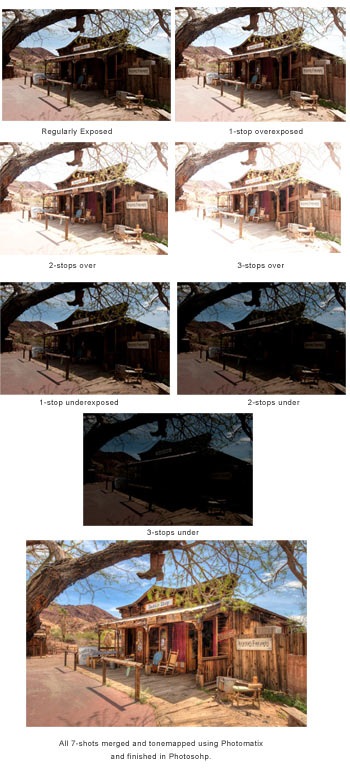
Below is an example of a set of 7 images taken at 1-stop exposure increments. Then merged and tone mapped.
3.jpg

The benefits of HDR

The human eye sees an outdoor or indoor scene quite differently than what can be captured with even top grade professional digital cameras and lenses. Not surprisingly, our eyes are far more complex.
Our eyes adjust for harsher light and render colors and detail more accurately than any single RAW file can capture.
With HDR you can produce wonderfully crisp images that have excellent detail and control of lighting. You do not need to worry about harsh sunlight or very contrasty scenes.
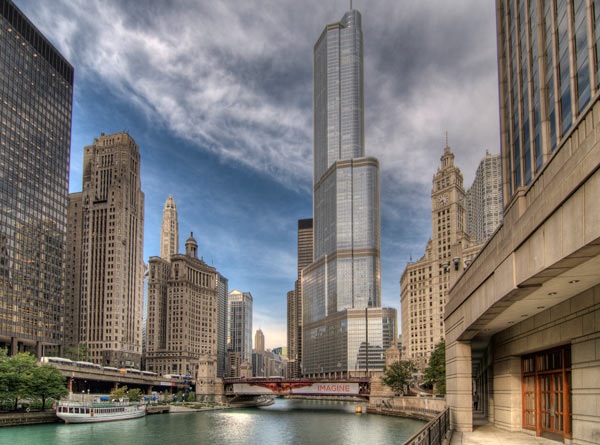
Below is an example of my regularly exposed single shot compared to my 7-shot HDR version. When printed, the HDR version has far more detail and an overall richer look to the image.
4.jpg

You control your final image

There is a lot of misunderstanding about HDR. As with all new creative techniques with so many creative opportunities available, we all tend to overdo it at the beginning.
This is okay, it is our way of experimenting and finding what we like and don’t like. For business applications, you can simply say what sells; although this may vary from client to client.

When would you shoot HDR?

  • Landscapes
  • Architectural and Commercial
  • All interior shots
  • Select wedding shots (church interior, vows)
  • Wildlife (animals standing still)
  • Night architectural
  • 5.jpg

    HDR in a Nutshell

  • Take 3,5 or 7 shots at different exposures
  • Merge bracketed sets into 32-bit images
  • Tone-map in HDR specific software
  • Finish in Photoshop

HDR Camera Set-up

Always shoot RAW. The RAW format is better for HDR than JPG. I have compared sets of JPG and RAW of the same scene and processed them in Photomatix and Artizen. The results are far better with the RAW images than the JPG.

Auto Exposure Bracketing Mode

Put your camera into the auto exposure bracketing mode. This allows you to run off a sequence of shots at different exposures by simply holding down the ‘shoot’ button.
It will depend on your camera as to how many you shoot in a sequence. Most DSLR cameras offer you up to 1-stop increments in bracketing mode. You would only ever go to a maximum of 2-stop increments. I shoot sets of 5 or 7 at 1-stop increments.
Some recent advanced compact cameras offer RAW shooting and Auto Exposure Bracketing.
Two that I know of are the Panasonic Lumix G3. It offers up to 7 shots at a max of 1-stop exposures. This is perfect for HDR. Also the Olympus E-PL3 offers RAW and up to 2-stops in AEB. These cameras are easy to carry around and offer a good introduction into digital HDR.

HDR Specific Software I Use

All these software programs are Mac/Windows compatible and offer free trial downloads.
6.jpg

Photomatix Pro

Photomatix offers many features and an intuitive, easy to use interface. It’s strength is outdoor daytime HDR. It really opens up shadows and produces very pleasing colours that are easily controlled with the sliders.

The batch processing feature is a huge time-saver. Merging one set of three, five or seven images into a 32-bit image can take from 10 seconds to over a minute, depending on your computer speed and how many images are in the set. If you have more than a few sets of HDR, (at Yosemite I had hundreds of sets) this consumes a large amount of time.

Photomatix’s batching feature allows you to merge dozens/hundreds of sets of HDR into 32-bit images automatically while you do something else. You then open the 32-bit image instantly in your software of choice and apply the tone-mapping, which is the only part that interests you.

With interior shots, Photomatix often introduces a blue cast into sunlight coming in through windows. I often use ‘Artizen’ or ‘Dynamic Photo HDR’ for interiors.
7.jpg

Artizen

I use Artizen for most of my interior HDR shots. Most of the time it gives me better results for what I’m looking for with interior shots.

Dynamic Photo HDR

I use DPHDR for some of my night HDR, and some daytime HDR as well. It depends how the image looks. It often creates more natural looking skies.
It’s also great if you want to go in a different creative direction. You can get a great variety of different colour effects.
But sometimes I see odd artefacts introduced into images; burnt skies or excessive noise. So I don’t recommend this program as your only HDR specific software. It is good to give you different creative ways to go.
8.jpg

HDR Efex Pro

Like all Nik software, HDR Efex Pro’s user interface is intuitive and easy to understand. I liked the variety of one-click presets, and it is easy to keep your HDR looking natural. I still prefer the colour in Photomatix for outdoor HDR though.

Nik’s patented ‘U Point Technology’ is included. With this you can fine-tune very specific areas in your image without effecting the rest of it.

Photoshop CS5 HDR

New to CS5 are some basic HDR tone-mapping sliders and presets. I have worked with it on some sets of HDR and compared it to the tone-mapping I get in the other software. The results are far better in Photomatix, etc.
Photoshop’s great strength is finessing the image after you have completed your tone-mapping. Removing blemishes, cloning, color, lighting correction and sharpening are essential, and none of the other software does this.

Single-shot ‘Pseudo HDR’

All the HDR software reviewed here give you an option to create a pseudo HDR out of a single RAW or JPG image. You really need RAW with single shot HDRs. The advantages are that you do not have to take multiple shots, and there will be no ‘ghosting’ to remove of people moving in the image.

However, you do not have the same dynamic range that you would have with multiple exposures. Pseudo HDRs tend to be noisy and you don’t get the same detail. But when you have rapidly moving people, animals or vehicles, pseudo HDRs often look far more interesting than just working the image in Photoshop. And they are very quick to process.
9.jpg

HDR and People

You can photograph people with HDR selectively. People posed, or a bride and groom standing still at the altar. Even if they are standing ‘still’ there is likely to be some slight movement between the frames.

This is referred to as ‘ghosting.’ The colour of the peoples faces will be incorrect as well. To correct this I use one of the bracketed set of regular RAW images and Photoshop to mask-in just the people into the HDR image.

It only takes 5-minutes. I only take a few HDR images with people in them. This captures the occasion in a way I could never achieve otherwise.
10.jpg

My HDR Work flow

My HDR Work flow I download all my HDR sets into a folder. I sort the winning sets in
Photoshop/Bridge or Lightroom, and move them to a ‘Winners’ folder. Different sets must be kept together. Don’t mix a set of three with a set of five or seven, it will completely mess up the batch processing.

Batch rename the winning sets in Photoshop or Lightroom with a number sequence. If I have 20 sets of five bracketed images, it will be numbered 1 through 100.

I then use Photomatix to batch my 20 sets of five into 20 single, 32-bit images. While Photomatix is doing this, I’m in Photoshop or doing something else.

When Photomatix finishes it’s batching, I go in and open the 32-bit images in Photomatix for tone-mapping. The tone-mapping is very fast. Once I set-up the sliders for the first image, I usually stay pretty close to those settings for the other images. I then finish the image in Photoshop.
11.jpg

Avoiding HDR Issues

Halos can be an issue with HDR images. Halos are usually found where the sky meets buildings or trees in an image. It is a line, or band, of lighter sky. It does not look natural and is very distracting.
You usually get if using extreme settings in your tone mapping, although sometimes you may still see halos even with conservative settings. In that case you may have to swap out the sky in your HDR image with the original sky in one of the bracketed images in Photoshop.
12.jpg
Over saturation is easily controlled in all the programs I reviewed here. Once you have the settings the way you like them, you can save them as one of your custom presets.

You have complete control over your image. It is easy to stay within a regular color range, but still gain a significant advantage by using HDR. You have to watch you do not overdo it, particularly with skies.
13.jpg

Finishing in Photoshop

Although the HDR specific software is great for the merging and tone-mapping
stage of your HDR sets, there is no substitute for the final finessing of your image in Photoshop.
I usually use a custom ‘curves’ adjustment. You can use the brush tool on the ‘curves’ mask to adjust how much of that curves is used in your image, and where it is used.

Another excellent, but often overlooked adjustment layer, is the ‘Shadow/Highlight’. There maybe areas of the image that require careful cloning out. Don’t forget that sometimes you can use the ‘spot healing brush’ to blend away something small in your image instead of always using the clone tool. Photoshop CS5’s new ‘content aware’ brush option is very handy for fast clean-up as well.

The last thing I do is selective sharpening. I use high pass sharpening for all my images that do not have people in the image. You find this under ‘Filter’, ‘Other’, ‘High Pass’. When people are in the image I use ‘unsharp mask’ or ‘smart sharpening’.
14.jpg

Creative Freedom

HDR gets quite a lot of criticism because many of the images are over-worked.
For that matter, any image can be overworked in Photoshop or any software, not only HDR.
Some photographers have become so worried about being criticised for using HDR, their HDR images look exactly the same as a single image worked in Photoshop. HDR is different; it has a vibrance and detail that is great for certain situations.

For some images I go further and use a full range of Photoshop adjustment layers, filters, masking and plug-ins to go in many different directions. We have so many creative tools to work with today; I’m not going to limit myself to staying within a regular photograph all the time.
15.jpg
As the late famous photographer Fred Picker stated, ‘Photographers owe nothing to reality.’ I offer my clients both types of images. Gavin Phillips offers HDR webinars and training movies. He also offers custom Photoshop ‘actions’ and Lightroom Presets. See his website for more information.

Action Sequence Photography Tips with Strobe Lighting

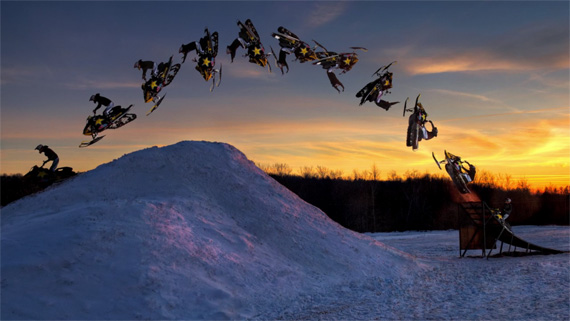
Professional snowmobiler and X-Games Gold Medalist, Justin Hoyer, teamed up with photographer Andy Kawa to create a freestyle snowmobile action sequence using high speed strobes and a Nikon D300. Take a tour of the shoot here:
 

FSTOPPERS BTS CONTEST 2011: HDR Strobed Action Sequence from Luke Parmeter on Vimeo.

Because typical speedlights won’t repower quickly enough to shoot an action sequence such as this one, Kawa used a Broncolor Scoro light kit which is capable of producing a lot of light in very short bursts. Using only two strobes, Kawa fixed one lamp on Hoyer’s take-off ramp and had an assistant man the second lamp to manually track Hoyer as he flew through the air on his snowmobile.
“Keep in mind that most cameras cant go above 1/250th second when using flash. Thats why a short flash duration is so important –light controls motion not the shutter speed,” explained Kawa.
After taking some test shots at a rate of 6 frames per second, Kawa realized that the figure needed to be backed down to 5 fps to prevent overlapping of some of the shots. After working out a shutter speed of 1/250 at f 4.5 on ISO 320, Kawa was confident that the next days shoot would produce the results he hoped to achieve.
action sequence photo with strobe lighting
Strobed Action Sequence Photo
For the final image, Kawa combined a total of 18 photographs that he processed in Adobe Photoshop. While working in Photoshop, he also took the time to edit out debris from the snow, adjust the contrast, and fine tune the exposure. Kawa made an additional version of the finished product, this time in HDR which was made from seven different images.

Tips for Travelling With Photography Equipment

Travelling with photographic equipment can difficult, but travelling without photographic equipment could be considered a waste of a journey by any photographer who truly loves taking pictures, so here are some handy tips that should take some of the stress out of travelling with your camera equipment.
travelling with photography equipment
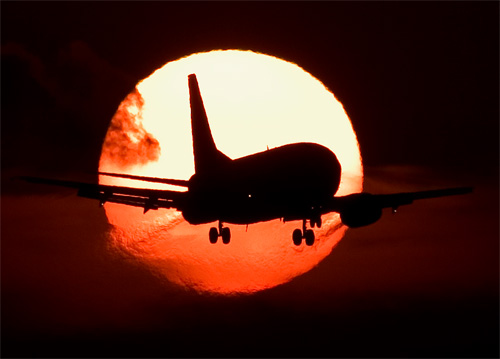
"Sunset Finals" captured by Thomas Millard (Click Image to See More From Thomas Millard)
It may seem like the most obvious piece of advice in the world, but if you are flying carry your camera onboard as hand luggage to avoid damage or loss. If you still use film them remember when you go through metal detectors, ask the attendant to hand-screen your rolls of film. It will help if you carry your film in clear canisters or remove it from its packaging and place it in clear plastic bags. However, if you can buy film at your destination, consider waiting until you arrive to buy it. It will at least make part of your trip easier for going through airport security screening devices.

Do not pack unprocessed film in luggage that will be stored in the cargo hold. The scanning equipment is stronger than the ones used for hand luggage and your film may well be damaged. Check your airline’s website to find out about hand luggage policies when travelling overseas, as some small airline operators do not allow you to carry luggage onto the plane with you.

Digital memory cards are not affected by x-rays, but magnetic devices could damage them. Conveyor belts may cause problems due to powerful magnets in the motors; although the risk is slight it is advisable to place your camera as far away from the beginning of the belt as possible.
If you’re travelling by car in a hot climate, keep your camera inside when you’re driving so it will stay cool and always remember to carry it with you when you leave your car; it can easily be stolen out of the boot (or trunk).

It takes only a couple of seconds for anyone to take an unattended camera bag so always, keep your eye on your equipment. If you need to put your bag down, at a hotel reception or by your side at a coffee shop, it is a good idea it place your foot through the straps as a ‘distraction thief’ may get your attention focused on something but cannot so easily get you to walk away and forget your bag without the strap tripping you up and reminding you it is there. Dangling a camera from your neck is not such a good idea either; it’s very easy to cut a strap with a quick cut of a sharp knife and snatch the camera. When walking with my camera I wrap the strap three or four times around my wrist and clasp the last section of the strap in my fist, then I am ready to take a photograph but the strap cannot be cut and the camera snatched.

Think about what you’re going to do about storing digital images before you go on your trip. Personally, I prefer memory cards and in my two Canon 5 d Mk ii I use 32 gb cards, each capable of storing over 1000 large Raw files. Lugging around a computer or portable storage devices is a hassle I can do without. If I need to be particularly protective about my images, I will either go to a ‘one-hour lab,’ and have them download the images to a CD, (though I keep the original images on the car too) or I go to an internet cafe and download the images direct to my website or to an online photo storage website. If I need more memory cards, I just buy them as they’re not hard to find and not too expensive. If I think it may be hard to find new memory cards then I simply take extra ones with me. You can never have too many memory cards.


Make sure you insure your equipment; even if you have an insurance policy in place already it is still worth checking with your insurance company just what will be covered and in what circumstances you can make a claim. Insurance companies are notorious for finding a way out of compensating clients for the loss of equipment in case of theft or damage. It has been known for an insurance company to ask for every item to be listed that was stolen, i.e. Camera, lens, lens cap, flash, diffuser, two memory cards, USB cable, and bag, then charge 200 excess for each listed item that was stolen as each item listed is a separate claim. As you can see from my short list the excess to be paid in the event of your camera bag being stolen is 1800, which for some cameras is more than the cost of the equipment lost. Check your policy, especially if the insurance is cheap, but even if you have paid a lot, still check the policy carefully.
Unless you know your camera inside and out, take your manual with you. Just pack it in your luggage. Make sure you take all your cords, etc. with you, but remember to check the insurance Terms and Conditions. If may need to bring an electric plug adapter if you are travelling overseas, remember to check this before you go. Bring one for your car too; if you’ll be doing a lot of shooting in the field it can be very useful.
Protect your camera from inclement weather and avoid leaving your gear in extreme heat or cold. If it rains unexpectedly, the very least you should do is get your camera under an item of clothing to shield it from the worst of the rain.
If it’s cold, keep your camera warm with your body heat to avoid condensation. If condensation does occur, remove the battery and memory card and keep the compartments open until they are full dry. If you take your camera back outside with condensation inside, it may freeze or even short when the power is turned on. Protect your lens by using a UV filter.
Take equipment you’re familiar with using. Travelling isn’t the time to try out new equipment; if you want get good results do your practicing before you leave. Travel light with a good bag and don’t bring every lens or body you have “just in case.” I never travel with more than three lens 50mm f1.4 24-70mm f2.8 and 70-200 mm f2.8 which I find adequate for all eventualities. Obviously your range of lenses will depend on the type of photography you intend to do as well as your budget.
Finally if you’re going overseas, declare all your photo equipment to customs officials at the airport before you leave so you will not have to prove ownership when you return home thus avoiding little problems such as being presented with a bill for import duty that you then will need to contest.
But ultimately, have fun and fill your cards with wonderful travel photos.
About the Author:
William Johnston is a professional photographer providing wedding photography and portrait photography throughout Bristol, Wedding Photographer Bath and Somerset, the South West, Birmingham and the West Midlands, Leicester and Leicestershire, London and the home counties.
PictureCorrect note:
We recently lost an important piece of luggage traveling with Turkish Airlines from LAX to Dubai. It was a rugged waterproof pelican case filled with camera equipment and we found ourselves powerless to recover it. Turkish Airlines would not give us any information and we didn’t hear anything until our case showed up a whole week later delivered by a 3rd party delivery person who had no idea where the case had been held up. Next time, we plan on using GPS tracking devices with important pieces of luggage to give us at least some information about where lost equipment might be if we ever lose something again.

Thursday, February 9, 2012

Nikon D800 and D800e announced

There has been chatter on the interweb for what seems like ever, surrounding the the new offering from Nikon. Here it is, finally, for you to lust after! Nikon D800 & D800E $2,995.00 and it’ yours!

Will you be cashing in and picking one of these cameras up? Comment below!

Here’s the feature list.

Nikon FX-format CMOS sensor with 36.3 effective Megapixels Native ISO 100 to ISO 6,400 Manipulate light to your advantage Shoot broadcast quality video Comprehensive high-fidelity audio recording control Live view output on external monitors Integrated image sensor cleaning system EXPEED 3 image-processing engine Advanced Scene Recognition System Time-lapse photography Advanced Multi-CAM 3500FX autofocus sensor module Versatile AF-area modes High-precision, high-durability shutter High dynamic range (HDR) Don’t miss a moment 3.2 inch, 921k-dot LCD monitor Lightweight yet durable construction High-speed CF and SD dual card slots

Let’s have that all explained.

Nikon FX-format CMOS sensor with 36.3 effective Megapixels With a huge 36.3 Megapixel full-frame CMOS sensor your photos will have more detail than ever before. The sensor is 35.9 X 24 mm – producing such incredible detail, that the Nikon D800 can render textures and nuances equivalent to high-end medium format cameras. Define every eyelash, every line in tree bark, and every shimmer of light. You can now savour the exceptional depth in your photos and enlarge them as big as A1 posters at 200dpi.

Native ISO 100 to ISO 6,400 – expandable to the equivalent of ISO 50 to 25,600 High-resolution, studio-quality images shouldn’t be restricted to the studio. The Nikon D800 sets a new benchmark for high-resolution DSLR cameras, with clean and crisp images across a wide ISO range. Flexibility like this opens up new imaging opportunities for still photographers and cinematographers. Even at high ISO settings, the camera’s intelligent noise reduction systems manage noise without sacrificing fine details, giving the nikon D800 the edge on its competition. The difference can even be seen in low-contrast subjects such as hair and grass textures, which are often essential elements of cinema as well as high-resolution portraits and landscape images. High image quality at higher ISOs also means that you can shoot still images handheld more confidently, knowing that fast shutter speeds will reduce blur.

Manipulate light to your advantage With the Nikon D800, our engineers have combined high-resolution performance with a wide ISO range –making many photographers dreams a reality. New methods have been employed to manipulate light transmission to the sensor’s photo diodes, delivering crisp, brilliant images with significantly less noise.

Shoot broadcast quality video Many filmmakers require the highly mobile, lightweight and compact advantages of a DSLR in order to cover large events, make documentaries, music videos or movies. For these professionals, the Nikon D800 is ready to create incredible cinematic experiences. The Nikon D800 is capable of shooting full 1080p HD video in either FX or DX modes – yours to choose depending on your creative intentions. Combined with the processing power of the new EXPEED 3 processor, you can shoot broadcast quality video at 30 frames per second.

Comprehensive high-fidelity audio recording control The Nikon D800 is designed for crisp stereo recording with a built-in external stereo microphone input. Attach the compact ME-1 Stereo Microphone to record clear sound while significantly reducing mechanical noise. An external headphone jack enables you to effectively monitor and control audio in isolation.

Live view output on external monitors While shooting movies you can now simultaneously check the video feed on an external monitor using an HDMI connection, in addition to the camera’s TFT monitor. For those who need the purest video output for professional quality editing, you can now record uncompressed movie live view footage directly to an external storage device via HDMI interface.

Integrated image sensor cleaning system Ever experienced the frustrations of dust reaching your cameras image sensor? The Nikon D800 automatically prevents this. Employing Nikon’s new Integrated Dust Reduction System the sensor self-cleans itself with four resonance frequencies to vibrate the optical low-pass filter and shake dust away. There’s also no need to worry if you’re shooting landscapes at low shutter speeds – you can set the self-cleaning sensor onto manual to prevent any camera shake.

EXPEED 3 image-processing engine: speed, versatility, and high performance To process the Nikon D800’s huge 36.3 megapixel full-frame CMOS, Nikon engineers have included the new EXPEED 3 image processing engine so you don’t have to sacrifice speed for the privilege of incredibly high-resolution photos. From image processing and card recording to image playback and image transfer, EXPEED 3 manages massive amounts of data at faster speeds than the acclaimed EXPEED 2 processor. Even with specialised processing features like Active D-Lighting and highISO noise reduction, capture speed is not affected. EXPEED 3 is so powerful that it handles data-intensive tasks such as Full HD video recording at 30fps with ease.

Advanced Scene Recognition System with 91K-pixel RGB sensor Nikon’s revolutionary Advanced Scene Recognition System, introduced with the flagship Nikon D4 camera, is also employed in the Nikon D800. At its core is a 91K-pixelRGB sensor that meticulously analyses each scene with fine resolution. The RGB sensor can recognize your scene’s colours and brightness with unprecedented precision then use that information to implement various automatic controls and give you more natural-looking results. The real breakthrough, however, is that the sensor can detect human faces with startling accuracy when shooting through the optical viewfinder. Along with face detection, detailed scene analysis is utilised to support more accurate auto-focus; auto exposure and i-TTL flash exposure results in a diverse range of compositional and lighting situations. The improved subject tracking is most noticeable when using 3D-tracking, which can maintain a focus on moving subjects smaller in size than with previous generations.

Time-lapse photography Capture a variety of scenes and subjects at a breathtaking pace. The Nikon D800 lets you set intervals and frame rates in order to dramatically relay slow-moving activity at dramatic speeds. The Nikon D800 allows you to shoot time-lapse photography with replaying rates from 24 times to 36,000 times faster than normal. Time-lapse photography files can be saved as a movie file.

Advanced Multi-CAM 3500FX autofocus sensor module Accurate AF detection is crucial for extremely high-resolution still images in every situation. The 51 sensor points in the Nikon D800’s AF sensor module work down to -2 EV (ISO 100, 20°C/68°F), the approximate physical limit of human visibility through an optical viewfinder. For even more powerful detection, you can rely on the camera’s 15 cross type sensors in the centre to detect both vertical and horizontal lines when using any AF NIKKOR lenses of f/5.6 or faster. What’s more, AF can be activated with eleven focus points in the centre with open aperture of f/8, which is a big plus when you combine a telephoto lens with a 2.0x teleconverter to shoot distant subjects.

Versatile AF-area modes Whether it’s a still life, a portrait, a landscape or a candid street scene, your subject matter varies, but its importance doesn’t. That’s why the Nikon D800 offers four AF-area modes, each specifically tailored to adapt to various subjects. Single-point AF is ideal when you need pinpoint focus on stationary subjects. Dynamic-area AF has three options (9-point, 21-point and 51-point) and is ideal for shooting moving subjects. The selected AF point and the surrounding points keep your subject in sharp focus even if it briefly leaves the selected points. 3D-tracking allows you to maintain focus on subjects that are moving erratically from side to side. Auto-area AF detects human faces and prioritises their sharpness for you — an ideal choice for candid photography.

High-precision, high-durability shutter The Nikon D800’s shutter unit has been tested to well over 200,000 cycles of release to prove durability and precision. While the shutter unit is designed to run at a speed range of 1/8,000 to 30s, its intelligent self-diagnostic shutter monitor automatically monitors actual shutter speeds in order to correct possible variances that can occur over time.

High dynamic range (HDR) The Nikon D800 can shoot two frames in a single shutter release, but at different exposures: one overexposed and one underexposed. The camera then instantly combines them to create an image covering a wider dynamic range. The range can be widened by up to 3 EV for different looks, all full of saturation and tonal gradation, while the smoothness of the edge where the two exposures meet can be adjusted for a more natural appearance.

Don’t miss a moment The Nikon D800 is designed to respond immediately. Once the camera is turned on, it starts up in approximately 0.12 seconds* and your finger is in position for shutter release. Release time lag is minimised to approx. 0.042 seconds*, equivalent to that of the Nikon D3S. The Nikon D800 also has the ability to shoot continuously at 4 fps in FX mode, and 5fps in DX mode. (*Based on CIPA Guidelines)

3.2 inch, 921k-dot LCD monitor The Nikon D800’s large and sharp colour LCD monitor delivers bright, crisp image playback with a much larger capacity for accurate colour reproduction. Using an anti-reflective structure, you can count on clarity equal to that of the D4, even under bright conditions. Moreover, if monitor brightness is set to “Auto”, the camera automatically adjusts LCD brightness according to the environmental lighting conditions measured by the ambient brightness sensor, allowing easy use of live view in both bright and low-lit places — very useful when shooting video and stills. The ability to magnify playback images up to 46x (Large-size images in FX format) is extremely helpful for spot focus confirmation.

Lightweight yet durable construction The Nikon D800 has been designed to achieve better durability and lighter weight. The result is a camera approximately 10% lighter than the Nikon D700, yet just as rugged, weighing in at around 1,000 grams. A magnesium alloy construction protects the camera against accidental shock, and weather and dust sealing has been extensively applied and severely tested, making the Nikon D800 as reliable on the road as it is in the studio.

High-speed CF and SD dual card slots Card recording speed is yet another crucial element of a smooth and productive shooting experience. The Nikon D800’s CF memory card slot is compatible with the latestUDMA 7. The SD card slot is compatible with SDXC (Secure Digital extended Capacity) and UHS-I. You can also use two cards simultaneously for a number of functions, such as recording JPEG and RAW data on separate cards, recording the same data simultaneously on two cards for backup.

What do you think? Tell us if this one “is for you” or not, below in the comments!

Twitter Delicious Facebook Digg Stumbleupon Favorites More